Arabic Henna Designs for Hands: Stunning Patterns to Try Today
Introduction
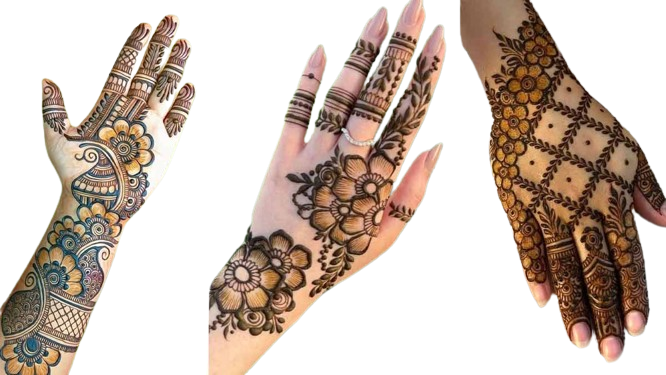
Arabic henna designs for hands have been popular for centuries, cherished for their elegance and beauty. Originating from the Arabian Peninsula, these intricate patterns have found their way into various cultures, becoming a beloved form of body art worldwide. Known for their bold and flowing patterns, Arabic henna designs often feature flowers, leaves, and vines that beautifully adorn the hands. Whether you’re preparing for a wedding, festival, or simply want to indulge in some artistic expression, Arabic henna designs offer a sophisticated and stunning option. In this blog, we’ll explore the unique characteristics of Arabic henna, guide you through some easy designs, and provide tips to ensure your henna looks its best.

Why Choose Arabic Henna Designs for Hands?
Arabic henna designs are favored for their simplicity and elegance. Unlike other henna styles that may cover the entire hand or feature very detailed patterns, Arabic designs are characterized by their open spaces, bold lines, and large motifs. This makes them relatively quicker to apply and visually striking. They’re perfect for anyone who wants to make a statement without the design being overly complex. These designs are versatile, suitable for both casual and formal occasions, and can be customized easily to fit any style.
Characteristics of Arabic Henna Designs
- Bold and Flowing Patterns: Arabic henna designs are known for their bold lines and flowing patterns that often resemble vines or floral motifs. This makes them easy to apply and visually impactful.
- Use of Negative Space: One of the key features of Arabic henna designs is the strategic use of negative space. This technique allows the skin to show through, creating a contrast that makes the design stand out even more.
- Floral and Geometric Motifs: Common elements include flowers, leaves, paisleys, and geometric shapes. These motifs are connected with lines or swirls, creating a continuous flow across the hand.
- Asymmetrical Designs: Unlike symmetrical Indian mehndi designs, Arabic henna often uses asymmetry, making each hand look unique and artistic.
- Simple Yet Elegant: While some designs can be intricate, many Arabic henna patterns are simple enough for beginners to try, making them accessible for everyone.
Popular Arabic Henna Designs for Hands
Here are some popular Arabic henna designs that you can try:
1. Classic Floral Trail Design
- Description: This design features a series of flowers connected by flowing vines. The flowers can vary in size, with the largest typically placed on the back of the hand and smaller ones extending towards the fingers.
- How to Apply: Start by drawing a large flower on the back of your hand. Then, extend a vine from the flower’s side, adding smaller flowers and leaves along the way. Continue the vine towards the fingers, ending with smaller floral or leaf motifs.
2. Paisley Pattern Design
- Description: Paisley designs are a staple in Arabic henna. These teardrop-shaped motifs are often filled with intricate details and are connected with swirling lines.
- How to Apply: Begin with a large paisley shape on the palm. Fill it with detailed lines and dots. Add smaller paisley motifs along the sides of the hand and towards the wrist. Connect the paisleys with curves and spirals.
3. Bracelet Style Henna
- Description: This design mimics the look of a bracelet, making it perfect for anyone who loves jewelry-inspired henna.
- How to Apply: Draw a thick, bold line around your wrist to create the base of the bracelet. Add floral or geometric patterns on top of the line. Extend a design towards the back of the hand, incorporating leaves or small flowers to enhance the look.
4. Finger-Tip Henna Design
- Description: This design focuses on decorating the fingers, making it a quick and easy option for beginners.
- How to Apply: Start by drawing small floral or leaf motifs on the tips of the fingers. Connect these motifs with thin lines, creating a web-like pattern. You can add dots around the finger joints for additional detailing.
5. Elegant Mandala with Floral Touches
- Description: Combining a central mandala with floral elements gives a balanced and eye-catching design.
- How to Apply: Begin by drawing a circular mandala in the center of the back of your hand. Surround the mandala with leaves and vines. Extend the design towards the fingers and wrist with additional floral patterns.
Step-by-Step Guide to Applying Arabic Henna Designs
1. Prepare Your Skin
Before starting, make sure your hands are clean and dry. Remove any lotions or oils that could interfere with the henna’s adhesion.
2. Practice Your Design
If you’re new to Arabic henna, practice the design on paper first. This will help you get comfortable with the patterns and flow of the design.
3. Start with Basic Outlines
Using a henna cone, begin by drawing the main outlines of your design. Keep your hand steady and apply gentle pressure to create clean lines.
4. Fill in Details
Once the outline is complete, fill in the details. Use dots, lines, and small motifs to enhance the design. Take your time and work slowly to avoid mistakes.
5. Let the Henna Dry
After completing the design, let the henna dry completely. This usually takes 20-30 minutes. Avoid moving your hands too much during this time.
6. Apply Lemon-Sugar Solution
To deepen the color, apply a lemon-sugar solution to the dried henna. This helps keep the henna moist and improves its stain.
7. Leave It On
Leave the henna on for several hours or overnight for a darker stain. The longer it stays on, the deeper the color will be.
8. Remove the Henna
Gently scrape off the dried henna using a butter knife or your fingernails. Avoid using water to wash it off immediately.
Tips for Getting the Best Henna Results
- Use Fresh Henna: Fresh henna paste gives the best color and is easier to work with.
- Keep Warm: The warmth can help deepen the henna stain. Keep your hands warm after applying the henna.
- Avoid Water: For the first 24 hours after applying henna, avoid washing your hands with water as much as possible. Water can prevent the henna from setting properly.
- Moisturize: After scraping off the henna, apply a natural oil like coconut or olive oil to keep the skin moisturized and protect the design.
Conclusion
Arabic henna designs for hands are not only beautiful but also a fun way to express your creativity. Whether you’re a beginner or have experience with henna, these designs offer something for everyone. With their bold lines, floral motifs, and elegant patterns, Arabic henna is perfect for any occasion. Practice these designs and soon, you’ll be creating your own stunning masterpieces. So, grab a henna cone, follow these tips, and let your artistic side shine!
Call to Action
If you enjoyed this guide on Arabic henna designs for hands, don’t forget to share it with your friends and family. For more henna inspiration and tutorials, subscribe to our blog and follow us on social media!

Download the Pankhudi Henna App Today!
Ready to unleash your creativity? Download the Pankhudi Henna app now from the Play Store and explore endless henna design possibilities. Whether you’re a novice or a seasoned henna artist, our app is tailored to meet your needs.Download Pankhudi Henna App Join our community of henna lovers and start your journey with Pankhudi Henna today!


